

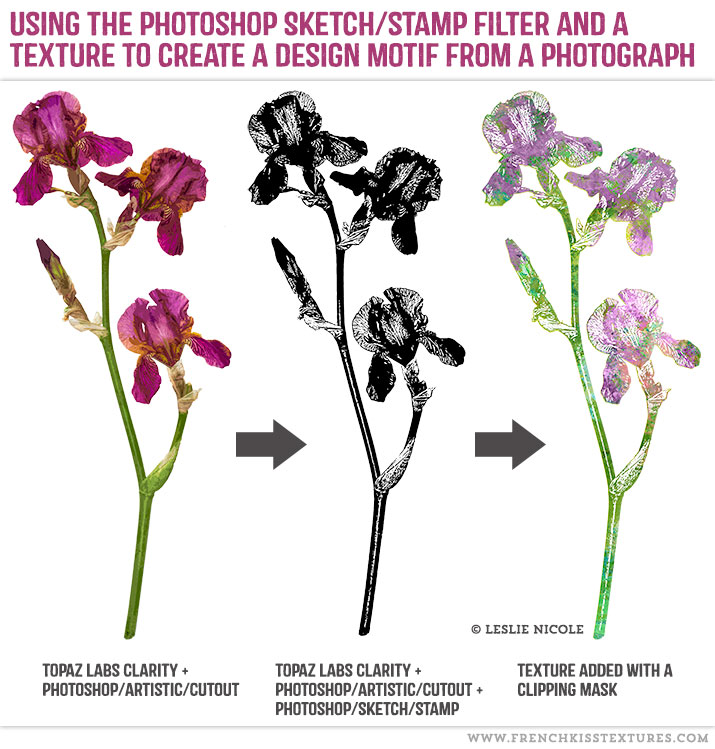
In the last post where I showed you my Photoshop filter exploration on an iris photograph, one of my examples was using the Photoshop / Sketch / Stamp filter. In this post, I want to show you how I used that filter result with a texture to create a design element.
Notes On the Photoshop Stamp Filter
- The Stamp Filter is found under Photoshop menu: Filter / Sketch / Stamp. If it is grayed out, your file must be changed to 8 bit. Note: you can also just open up the Photoshop Filter Gallery and then use the expanding folders to choose the Sketch category.
- Must Be 8 Bit: Many of the native creative Photoshop filters including Artistic and Sketch only work on 8 bit files. If you are shooting RAW file photographs, they will probably be 16 bit, so you will need to save a copy of your master photograph and change it to 8 bit. (Menu-Image / Mode / 8 bit.)
- Pre Filter – Clarity: I created my Stamp filter element from a file on which I had first used the *Topaz Labs Clarity and the Photoshop/Artistic/Cutout filters. I always use the *Topaz Labs Clarity or Detail filters on my master photographs and I do think this creates more detail for the further creative filters. If you don’t have the Topaz filters, just try to get your image sharp and detailed and that will be perfectly fine.
- Pre Filter – Cutout: I then used the Photoshop Artistic / Cutout filter to further simplify the details before using the Photoshop Sketch / Stamp filter. In testing, I did get better results using the Stamp filter by using the Cutout filter first.
- Play with the sliders to get the results you want. As you slide the top slider, you’ll notice that the amount of black increases and decreases. Smoothness will smooth out the edges of details.
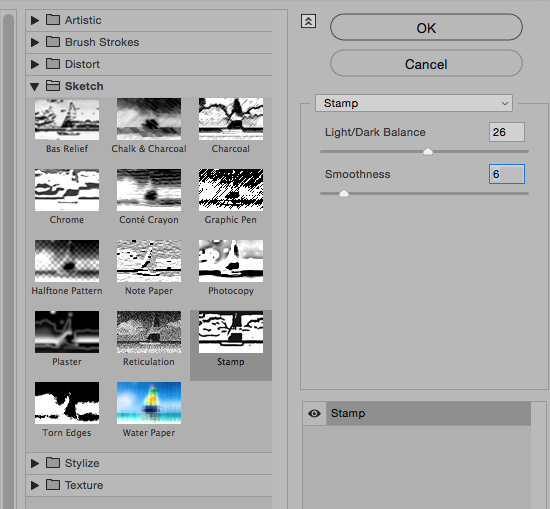
Photoshop’s Sketch / Stamp filter opened in the filter gallery.
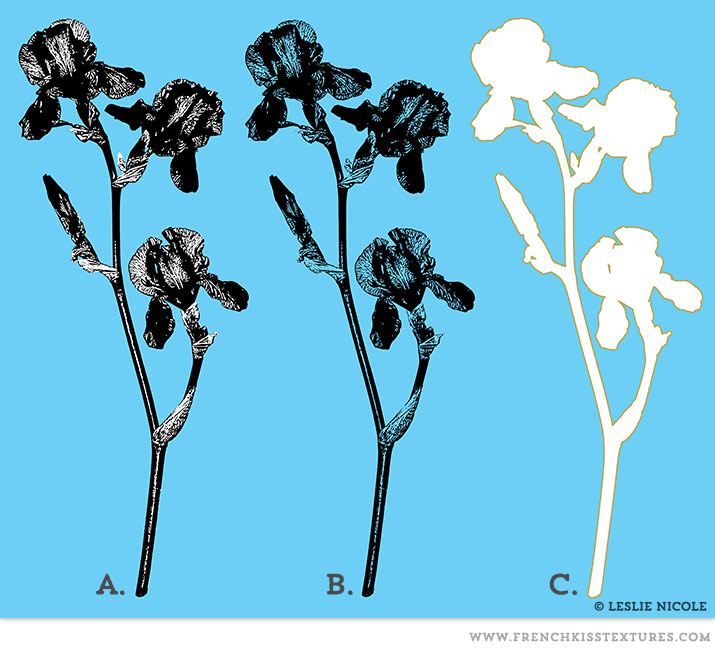
Creating The Floral Design Element
- A. The Original Photoshop/Sketch/Stamp file. Remember that the original iris photograph was cut out from the background, so the Stamp filter gave us a file with the background cut out, but the interior of the flower is white.
- B. Transparent: I saved a copy of the Stamp file and made all white areas transparent. (Note. I want to do an entire post on how I create transparent files, so I won’t go into detail on this here.) My apologies, I’ll get to this soon and update the post with a link.)
- C. White Fill and Stroke: I made another copy of the original Stamp file (A.) and made a selection of the flower by Command clicking the layer. (Control for PC) I then filled that selection with white. Option + Delete (Mac) Alt + Backspace (PC) with white as the foreground color. Then, I added an outer stroke using a layer effect. (Bottom of the layer panel, click the fx icon and choose the stroke option from the fly-out menu.)
Adding The Texture
I then added a painterly texture and used a clipping mask to constrain the texture to the transparent element layer.

The Layer Panel For the Iris
Here, you can see how the white filled element and transparent element from above are used. The texture is added with a clipping mask. (Check this post on using textures with a clipping mask. It’s with text, but it’s the same method.)
- The white filled flower with the outer stroke becomes the white interior background for the flower.
- The transparent black iris is used with a texture and a clipping mask. The clipping mask constrains the texture to the non-transparent areas of the layer it is being clipped to.
- The texture was darkened with a levels adjustment layer.
- More purple was added with a grunge brush in the areas with the iris flowers.
- I added selective burning in an overlay layer. (Filling with 50% gray is only so it’s easier to see the brush. Because the Overlay blend mode is a contrast blend mode, it doesn’t see 50% gray!)

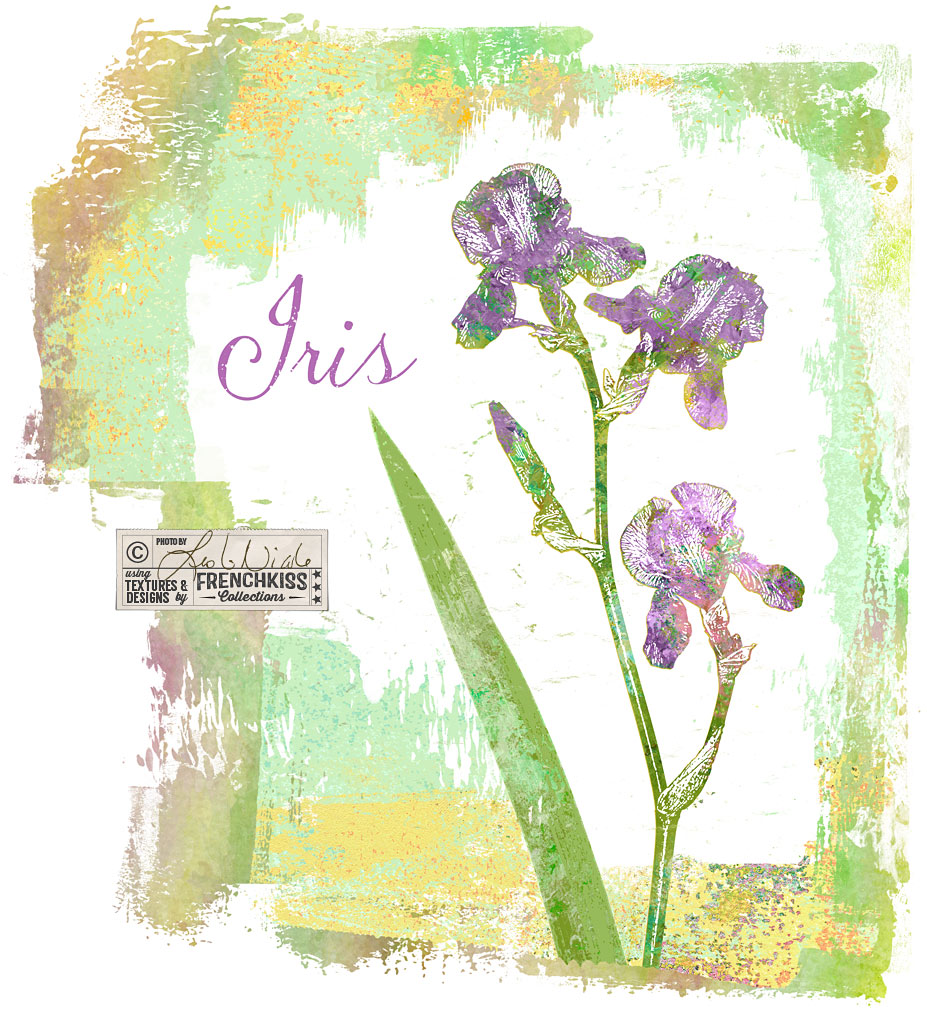
Usage Idea
This is a “doodle” I’m not sure what I will do with it but that’s where ideas come from – playing around and trying things. I thought it might be interesting to create a pattern with maybe 6 different flowers and a background. Maybe I’ll just end up stealing parts of this for something else! What I really wanted to show was how it’s possible to create an illustration from a photograph using basic Photoshop filters.
Resources
- *Topaz Labs Filters is an affiliate link. I get a small commission from any sales resulting from a click from this site (at no extra cost to you.) I really do love these filters. Nearly all of my own images use one of these filters. Thank you for supporting the site!
- Find Grunge brushes and masks in the French Kiss Collections Shop.
- Texture is Merengue (with additional color) from the Impasto Fresca collection.

American Photographer and Designer living in France with my French husband, 2 Weimaraners and Cat Rescues. Camera, Mac, studio, garden.

Very nice effect, Leslie. I appreciate all the info in your tutorials, easy to follow. Looking forward to soon trying your technique on a photo.