
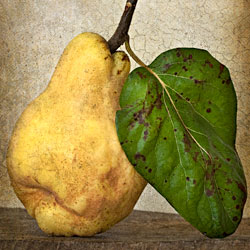


Final, textured Quince.

Image with based edits & Topaz Labs Detail Filter
Note: I’m no longer using image mouse-overs for the Before/After as they do not work on touch devices such as iPads.
Last week I showed you the pre-processing on the Before image.
This week, I’ll show you how I textured the image.
First Texture
First I added Nougat, from the Craquelure Collection.
Blend Mode: Multiply: Opacity: 100%
I only did slight masking, so a lot of the texture shows on the Quince.

Image with first texture applied.
Final Texture and Tweaks
I then applied the 2nd texture, Novella. (Novella is currently on Zenfolio. Note: I liked the final texture combo so much, I created another texture called Epic, which is also in the Craquelure Collection. )
Blend Mode: Multiply: Opacity: 100%
I masked this one quite a bit on the quince, leaf and some of the background. After textures, the image was looking a bit flat, so I applied a levels layer adjustment to increase the contrast. Finally, I saw a few spots I wanted to retouch, so I did some final retouching. That’s it! Nice and simple.
The Layer Panel.

Layer Panel showing the Layer Masks.

American Photographer and Designer living in France with my French husband, 2 Weimaraners and Cat Rescues. Camera, Mac, studio, garden.

I can see any photo, but until you actually look at it is so breath taking. Nice article and will for sure share your site. Thanks for the info. You will always appreciate nature’s beauty.
Twila recently posted..Fall Colors
Thanks for your lovely comment, Twila.
I want to show appreciation to you.
An interesting discussion is value comment. Certainly there are millions of more enjoyable moments up front for individuals who take a look at your website.
I really wanted to post a small message to be able to express gratitude to you for the unique pointers you are posting on this site.
Laverne recently posted..DiGeorge syndrome
Thank you for your beautiful textures and the tips and tricks to amazing artwork.