


A few tips for picking and prepping flowers and plants before photographing them. Includes choosing plants, when to pick, basic clean up, and creative edits.
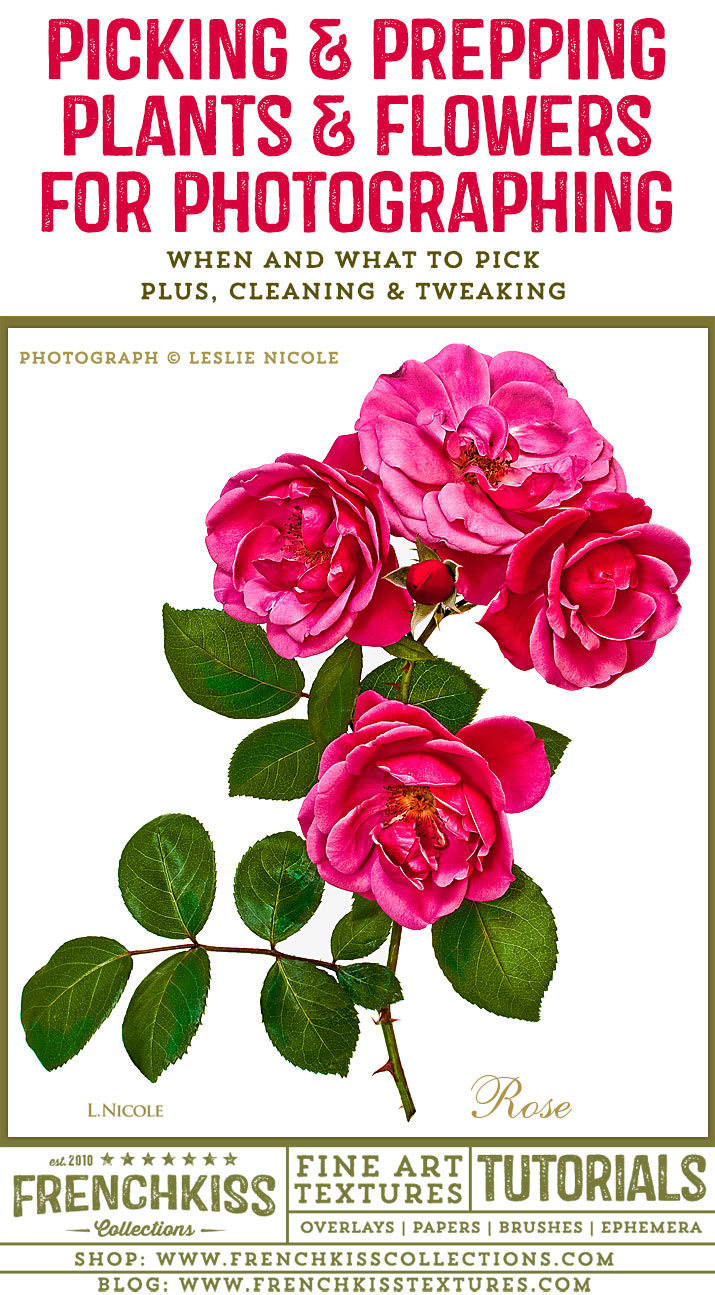
The roses in the featured image above were perfect as is. If I’m walking in the garden and see a particularly lovely flower cluster I grab it to photograph!
Some of these tips may seem rather obvious, but I thought it was worth beginning a series on photographing plants and flowers by starting at the beginning!
When To Pick Plants And Flowers
When you pick your flowers and plants can be important. The following should be considered:
- Time of day and weather. Plants picked early in the morning will probably be covered in dew. Depending on the season and climate this can range from a few sparkling dew drops to being soaking wet. Plants picked when it’s drizzling outdoors will also obviously be wet. A few dew drops on a flower can be quite charming in a macro or still life photograph, but if you plan on creating an illustration effect from the photo, too much moisture or dew drops will end up looking like weird spots after a creative filter is applied.
- Type of plant. Some plants and flowers last longer than others. Roses and dahlias will remain fresh and continue to open for several days. Flowers from trees are often more fragile. Lilacs and magnolias don’t last very long. (Tip: hammer the end of the stem until it breaks up. This will make them last a little longer.) Poppies are another flower that don’t last very long. (Tip: sear the stem ends on a hot frying pan. I just use the cast iron part of my burners. For some reason this will increase their life a little.) Leaves often don’t last very long at all unless they are evergreen. Even Fall leaves gathered from the ground will start to curl and dry within a few hours.
- When you will be photographing. Take into consideration the two points above with when you plan on photographing. For leaves, I don’t pick them until just before photographing. For sturdy flowers I might pick them the day before or I might pick them in the morning and let them dry until the afternoon. Flowers that are more fragile like poppies I photograph right away.
Choosing Plants And Flowers
Photography is a flat medium. The way a camera sees things is different than the way we see them. Before cutting off a flower, I turn it in different angles to see if it will work in a photograph. It doesn’t have to be perfect as some things can be changed with combining different photographs and/or doing focus stacking in post-processing. Sometimes though I won’t see until looking at them in the camera if they work or not. For instance, last week, I gathered a Fall maple leaf that was gorgeous. They way it was curved though, it just looked squat and uninteresting in the camera viewfinder.
While it’s preferable that plants be as perfect as possible, I don’t let it stop me if a gorgeous flower has some petals that the snails munched on. Petals can be cloned in where needed.

Combine Parts of a Plant If Needed!
Artists in traditional media have the advantage of interpreting a flower in the best way possible. Photographers can cheat a bit too, though! In the example below, I photographed a dahlia that was lovely, but I had already cut the center stem at an earlier time. Also, the buds were facing in the opposite direction from the best angle for the leaves. I photographed the flowers from the opposite side for the blossom and bud. I then used another flower from this dahlia plant to replace the center flower. To finish, the leaf on the back left dahlia stem was too small to see, so I borrowed a leaf!

Outdoor Prepping
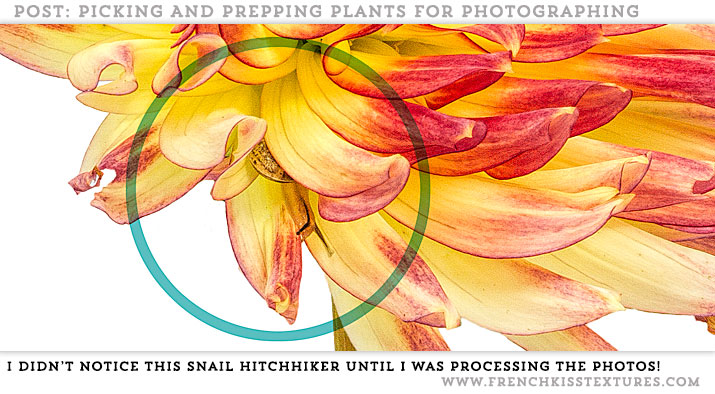
Before you bring plants in, give flowers a gentle shake to knock out lurking bugs. A light shake may not be sufficient, so prod out pests like snails curled up inside petals before bringing them indoors. Admittedly, a snail can be kinda cute, but earwigs—not so much—eww! This is more important in those flowers that attract these pests—like dahlias.
Indoor Prepping
Basic Cleaning and Preparation
- Clean plants: I don’t get too obsessive because sometimes it’s just as easy to Photoshop out little defects and tiny bugs than clean, but I do look over a flower for bugs, dirt, cobwebs, and insect/bird doo doo. There are often fine strands of cobweb you don’t notice at a first glance and while not difficult to retouch, it’s a minor pain. Use moistened cotton swabs to gently clean up plants and flowers. A small soft brush can be handy as well.
- Dry if needed: If plants are too wet, either lay on paper towels and leave for awhile and/or gently dab off moisture.
- Prune if needed: Pull away leaves and petals that are too old or eaten. I don’t hesitate to pull away petals from the back that are withered.
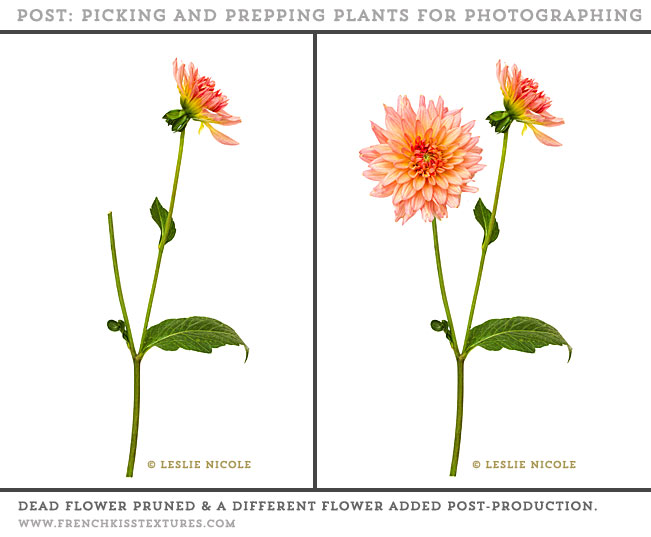
In the image below, the dahlia flower on the left was dead, so I snipped it. In post-processing, an alternate flower was added.
Creative Edits
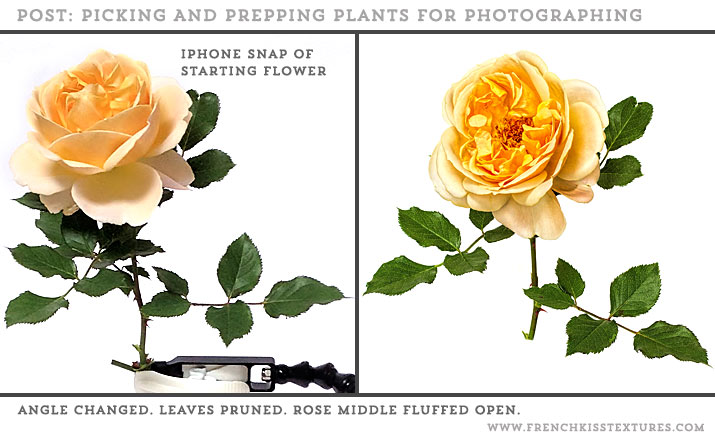
The Before & After below on the left is a quick iPhone snapshot of my starting shot. After seeing this in my view-finder I made the following changes:
- Change the angle. Slightly changing the angle gave me a better shot of the leaves and flower.
- Fluff the center. I’m not shy about opening up a rose more before photographing.
- Prune leaves. By cutting away the leaves at the top left, the other leaves stand out more. I could later also crop out the stem and bottom leaves in post-production to use the rose in a design.
- Style if needed: Too many leaves can just look like a jumbled mess. Cutting a few sprigs here and there can make a big difference. Fluff open flower centers a bit if desired.
What’s Next
In following posts I’ll cover:
- Backdrops and props for photographing plants and flowers.
- Further tips for preparing and posing plants and flowers for photographing.
- Photography and lighting technical information.
- Post-processing – getting the master image.
- Creative post-processing.
Questions?
Let me know in the comments if you have any specific questions for me.

American Photographer and Designer living in France with my French husband, 2 Weimaraners and Cat Rescues. Camera, Mac, studio, garden.

Yes, you are definitely a pro!
99,99875 % of all your fellows just take flower pictures from the position they are standing, not even bending over double to the ground or blossom. But you seem to have something perfectionistically in your personality! 😉
Uwe recently posted..Schanzenviertel street art & murals
what a GREAT tutorial! thank you Nicole
Thank you, Viktoria!
Excellent step-by-step explanation. I’ve never added in another flower in post production, but it makes sense. Thanks for the ideas.
Anita Bower recently posted..Janet’s Hat
Awesome. Glad that sparked an idea for you.
Love this tutorial! Excellent ideas. I do look forward to more. Thank you! I love your textures.
Thanks so much, Nancy!
HI Leslie
Thanks for sharing.i live in Australia and my Dahlias are just coming into flower.Looking forward to your next tutorial.
Thanks Marie. Enjoy your Dahlias – look forward to seeing your upcoming creations.
Thanks for sharing so many goodies – I hope to spend more time in Photoshop this winter!
You’re welcome!
Thanks for the great tips…for some reason, I sometimes get stuck in the thought that the original flower needs to be perfect to start with. Will look forward to future posts on the subjects you mentioned. First of the year will be here before we all know it! Am just now enjoying the last roses in my garden as we have had an unusually mild fall season.
Thank you, Karen. Yeah, definitely don’t let less than perfect flowers hold you back. At least for my intentions – I’m not trying to create scientific botanical examples – more artistic interpretations. Most flaws are pretty easily fixed. We’re having a really mild Fall here as well. Love that I still have Dahlias although they are slowing down.
Great tutorial. Made me want to rush out into the garden except the here in northern Canada everywhere is covered with snow! Wish spring was round the corner.
Many thanks, Janet
PS. I trust you are safe after the dreadful event of last week.
Janet Webster recently posted..What is old?
Hello Janet. We had our first big freezes this week. The Dahlias are now finished here too! Yes, we are fine here, thank you.
I have always been a big fan of your photography and graphic design. You are so generous to share your skills and techniques to us. Thank you very much, Leslie. I can see you have a great control on depth-of-field when you shoot flowers. Do you use macro lenses and set to a small aperture?
Sorry for my tardy response on this Danix. I got off track after shoulder surgery. Thank you so much for your lovely feedback! Yes, I usually use a macro lens – a Canon 60mm macro. I use a small aperture if I’m going for an artistic effect, but if I’m photographing a plant to be used in design, I use a higher number like f.11 so I can get as much detail as possible.
thanks, great tips!
Hello Nicole,
In the original article of 2015, you stated that there would be posts following that discussed “backdrops and props for photographing plants and flowers”;further tips for preparing and posing plants,etc”;”photography and lighting tech. info.”;” post-processing-getting the master image” and,” creative post-processing”. Anyway of sending the links to these discussions or when they were put in your blog?
Thank you for your time. I am looking forward to reading them. I like the detail of your articles Very helpful ideas. Wish I was as creative as you.
Best,
Denzil Hawes-Davis
Hi Denzil,
Indeed, my follow-up articles have been delayed for some time due to various reasons. I hope to add more soon. Thanks for the prompt. I’ll also be posting an article on why the delays soon.