Before and After tutorial using Photoshop clipping masks to customize textures to suit an image.

 French Kiss Collections, photography and design resources and tutorials
Fine Art and Grunge textures for Photoshop and Photography
French Kiss Collections, photography and design resources and tutorials
Fine Art and Grunge textures for Photoshop and Photography

Before and After tutorial using Photoshop clipping masks to customize textures to suit an image.
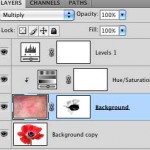
In this video tutorial we use an adjustment layer with a clipping mask in Photoshop to modify a texture without modifying the image below.
When using Vintage French Script Overlays and Photoshop Brushes, use the free grunge brushes in the layer mask to edit the overlay/brush to better suit your image.
Textures nearly always need to be tweaked to fit an image, even it it’s a slight tweak. This example uses a Levels adjustment and Color Balance adjustment.

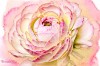
Example of how to change the color of your texture or digital paper. Also notes on image processing using filters and textures on a spring floral image.
Two quick tips for using Photoshop brush stamps. Learn best practices for placement and color selection methods.
Sometimes you have to really push and pull an image and a texture to get it the way you want it. Here’s an overview of my work process for this image.

Another photograph of our Weimaraner puppy, Liko. See the Before and After with detailed steps on how I processed the image.
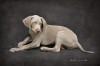
We have a new Weimaraner puppy! Let me introduce you to him and show you the Before and After with detailed steps for this textured puppy portrait.

The difference between the Watercolor Spot textures and the Watercolor brushes and overlays with tips and examples.