Let’s say you want to apply some texture to an image, but you don’t want to change the colors of your image. Let’s look at a few methods you can use.
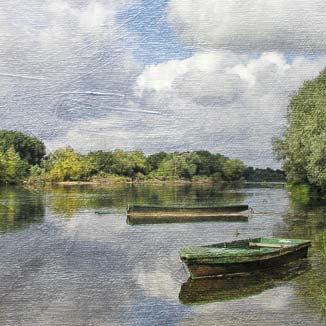
The Original Image
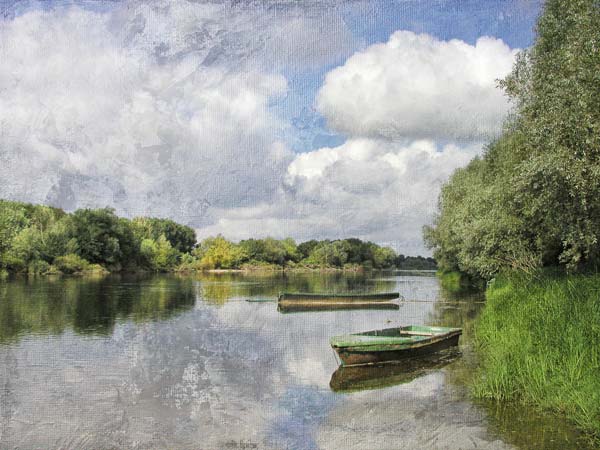
Here’s a photograph I took of some boats on the Vienne river (a tributary of the Loire River in France). I don’t want to change the colors too much, but I thought it would be nice to give it a painterly look.
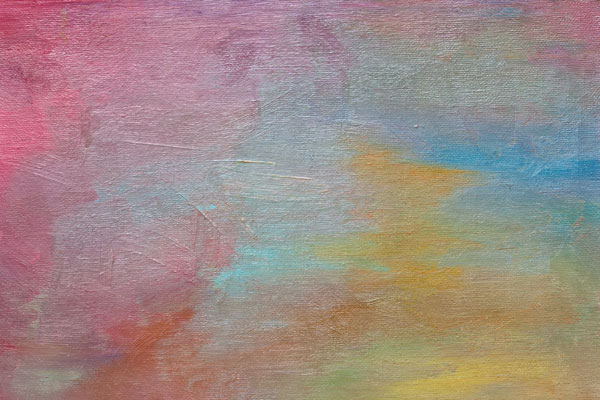
The Original Texture
Here’s a texture from the French Kiss l’Artiste Collection.
I’ve purposefully chosen one of the most colorful textures for this demonstration. While these colors could work well in a floral or a different landscape, they are too strong for my intent here. So, I’ll desaturate the color on the texture.
Different Ways To Desaturate The Texture Color
- Change the Color Mode of the Texture to Grayscale before you place it.
- Desaturate the image via the menu: Image / Adjustments / Desaturate.
- Use a Hue/Saturation Adjustment layer as a clipping mask. (texture already placed.)
Desaturating with a Hue / Adjustment Layer
Both changing the texture to grayscale or desaturating are pretty straight-forward. Let’s look at some advantages of using a Hue-Saturation Adjustment Layer instead though. (Plus, this is a pretty cool technique you’ll want to be comfortable with.)
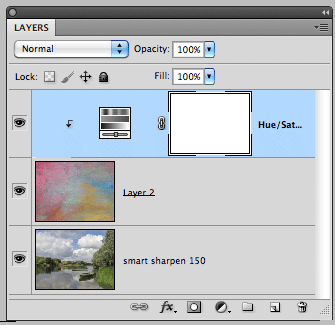
Layer Panel
The screen grab below of the layer panel shows a Hue-Saturation Adjustment Layer used with a clipping mask.
(see tutorials on clipping masks and adjustment layers)
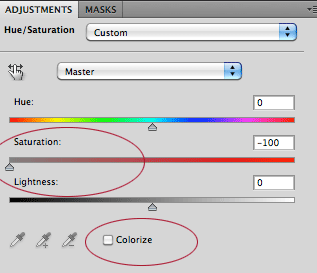
Hue / Saturation Adjustment Panel
To desaturate, slide the saturation adjustment all the way to the left.
(see the graphic below.)
Why I like this method:
- you can make adjustments in the saturation to leave just a little hint of the color.
- Use the Colorize option to change the texture to a monochrome such as sepia.
Then, you can also adjust the saturation to get just a little color or a lot.
The Final Image
Here’s my final image with the desaturated image placed.
A few important tips:
- I’ve usually found the Overlay blend mode works best for this method.
- You may need to adjust the contrast of the desaturated texture. I like the Levels adjustment.
- Sharpening the texture can help emphasize the texture.
Here I’ve used Topaz Labs Detail filter. (affiliate link)
An Alternate Texture
In the French Kiss l’Artiste Collection, I’ve included several monochromatic textures intended specifically for this technique. My favorite texture with this image is the Impasto Overlay II.
American Photographer and Designer living in France with my French husband, 2 Weimaraners and Cat Rescues. Camera, Mac, studio, garden.




Wonderful tutorial. I need to play around with the blend modes I think. I have tended to use Soft Light or Multiple. One is barely noticeable, the other very dark and does change the color of the image too much. Thank your for sharing!
Kim@StarrySkyRanch recently posted..Ben
Thank you, Kim!
great tutorial, thanks for the info, I have just started working with textures, and love it. such great inspiration!
jmeyersforeman recently posted..black and white landscapes
great tutorial, thank you!
Deborah recently posted..{Texture Tuesday} ‘free & easy’ eDition
Love short concise tutorials! Your image textured is outstanding! Frame worthyÜ Thank you, Leslie, for your inspiration!
I love your textures and in fact, all of your site. I can tell you real out a lot of care into your work. I’ve just bought my first set of textures from you and I’m sure I’ll be back for more!
Thank you, Stewart!
Great ideas! Thank you!
Leslie, thanks so much for putting these terrific tutorials together!! They are so helpful when we’re in the process of learning (for me…that’s constant LOL) =)