

Before & After
Now that we’ve covered using Clipping Masks in the video, Using Clipping Masks In Photoshop to Modify Textures, I wanted to show them applied in a real life image.
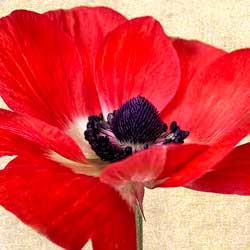
The Original Image: an Anemone de Caen from the garden. I photographed it with a Canon 40D and a Canon EF-S 60mm f/2.8 Macro

- The original image.
I added the French Kiss Texture New Day and set the Blend Mode to Multiply and the Opacity at 100%. I chose this texture as I had the idea that I would like the green vignetting and I thought the purple might set off the red flower.

- French Kiss Texture, New Day added. Multiply / 100%
I do like the vignetting, but the texture is overall too dark and the purple is too heavy.
I applied a levels adjustment layer clipping mask to brighten the texture.

- Texture with Levels adjustment clipping mask.
This is better, but It’s still too purple. I’ll next use a Hue / Saturation adjustment layer to desaturate the purple. I chose the Magenta and completely desaturated it and I adjusted the hue to -7 in the master. Note the Layer Panel graphic below how I painted black on the layer mask to reveal a little bit of the purple towards the bottom.

- A 2nd adjustment layer is applied for Hue/Saturation.
I’m really liking the vignette, but it feels a bit cold. I decide to add another texture. I’ve added the French Kiss Texture, Tuffeau. Multiply / 79%

- A second texture added.
This is indeed warmer and I like the extra texture, but it’s looking a bit drab, so I apply a levels adjustment layer as a clipping mask and brighten the texture. Note the layer panel illustration how I’ve painted on the layer mask to keep the edges darker while brightening overall.

- The second texture adjusted with Levels to brighten.
Better! Now, I’ll just do a few last minute adjustments. I add an overlay layer to dodge around the flower to brighten further and I apply another adjustment layer to further brighten the entire image.
Here’s the Layer Panel. I’ve circled where I’ve used the clipping masks.

As you can see, we can dramatically change our textures using adjustment layers and clipping masks. The following shows you how the image would have looked with no adjustments to the textures.

- With no adjustments, the image would have looked like this.
The final image with clipping masks, dodging and adjustment layers.

- The Final Image thanks to Adjustment layers and clipping masks.
Photograph, Solo Anemone © Leslie Nicole
| All of these Textures from the French Kiss Texture Collection I | |
 |
French Kiss Texture: New Day
Notes: |
 |
French Kiss Texture: Tuffeau
Notes: |
 |
French Kiss Texture:Sentier ForestierNotes: This is the result of combining the two textures above. I liked it so I saved it as a new texture |

American Photographer and Designer living in France with my French husband, 2 Weimaraners and Cat Rescues. Camera, Mac, studio, garden.

Super tutorial!