
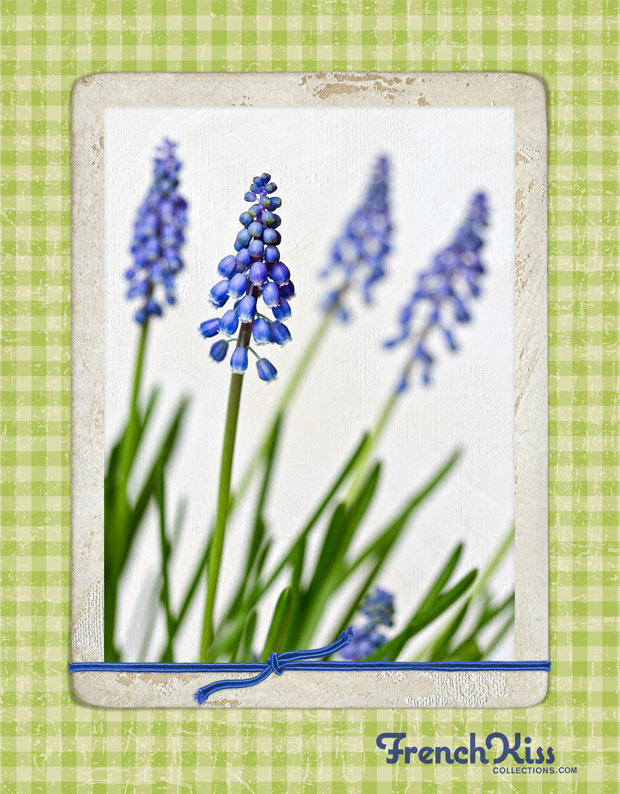


In a perfect world, when placing an image under a digital frame, it would fit perfectly, but this usually isn’t the case. Normally, it will need to be re-sized and masked. I’ll show you the most pain-free way to place and size your image, plus how to add an inner shadow between the frame and the image.
Preparing The Background and Frame
- First, open up the digital paper or texture that you will be using as the background.
- Then open up the frame and place it in the layer above the background. (Tip: hold down shift as you drag the frame to the background file to center the frame.)
- Choose the rectangle custom shape tool (Rectangle tool, keyboard shortcut U) and drag out the rectangle to be just slightly larger than the inner window of the frame. I like using the custom shape tool because when the layer is selected, it shows the outer edges even if it isn’t the top-most layer. This layer should be placed under the frame layer. I usually use black or gray for the color, but it doesn’t really matter.

Showing the ideal size of the custom shape.
Placing Your Image
Now, place your image under the frame layer and just above the custom shape layer. At this point, your image may be too big or fall outside the frame. No worries. Below is how my image looked when I first placed it.

Placed image before masking and re-sizing.
Masking The Image
Now, we’re going to mask the image using a clipping mask. With the image layer selected, hold down the Option key (Mac) or the Alt key (PC) and hover your mouse between the image layer and the custom shape layer in the layer panel. Depending on what version of Photoshop or Elements you are using, you’ll see a small icon appear. (Note, some versions of Elements may not have this option.) Click the mouse and you’ll see the image layer clip to the custom shape layer. Note the small arrow pointing down on the image layer in the layer panel. Tip: If your image wasn’t centered, it may disappear. Just use the move tool and drag it into position.) For more detailed information on clipping masks, see this tutorial.

Photoshop Layer Panel showing a clipping mask.
Resizing The Image
Now that the image is placed and masked, simply use the transform tool to re-size the image as desired. Command + T (Mac) or Control + T (PC) For more information on using the transform tool, see this video.
Adding A Shadow
Sometimes, especially on a very light image, it can be beneficial to create more separation between the image and the frame. Look at the first image in the post and you’ll see a slight inner shadow between the frame and the image. Now, if the image fit the frame perfectly without a clipping mask you could just add an inner shadow to the image, but since normally the image does need masking or overlaps the frame too much, we’ll apply the inner shadow to the Custom Shape layer instead.
- With the Custom Shape Layer selected, apply an Inner Shadow layer style. In Photoshop, this can be added with the FX icon on the layer panel. In Elements, use Effects/Layer Styles/Inner Shadow.
- The options in finessing the Inner Shadow are much greater in Photoshop. It’s best to use this effect with a delicate touch. A typical settings that I use would be: Opacity: 40%, Distance: 0, Choke: 5, Size: 35. This is for a fairly large file. You’ll need to adjust for file size.
- In Elements, there aren’t as many adjustments. You can open up and adjust the size and opacity by clicking on the fx symbol in the layer panel. I couldn’t find a way to change the distance to 0 so in Elements, the shadow will have an offset, which isn’t bad, just different.
- Note: if you aren’t seeing anything happen, it may be that your custom shape layer is too big for the frame. Try transforming it with the transform tool and see if this makes a difference.
Image Details
- Photograph © Leslie Nicole
- Muscari photograph uses the texture, Crème Fraîche from the French Kiss Tableaux Collection.
- Frame is from the French Kiss Vintage Frames Set.
- Digital Paper is a collection in production soon to be released!
- Frame Tie-Up. This one will be released soon, see Frame Tie-Ups No. 1


American Photographer and Designer living in France with my French husband, 2 Weimaraners and Cat Rescues. Camera, Mac, studio, garden.

Thanks a ton for this clear tutorial! I’ve been wondering how to make a shadow between the frame and the image. Now I know. Also a light bulb went off when you explained how to make the mask to clip the image to. So simple. Really appreciate your easy to understand tutorials.
Hello. I would like to use the frames without putting them on a background layer but cannot figure out how to do that and remove the transparent background. I am using photoshop element 10. Any suggestions ? Love your textures and tutorials! Susan
Hi Susan, You’ll need to have a background layer and then put something in the background layer, even if it’s just filled with white. Can you explain more what you are trying to do? Then I can help you further. Thanks for the feedback!
Thanks for the tutorial!
Another option – I have good success creating and adjusting a uniform “inner shadow” by using the “Inner Glow” blend mode. Here’s how:
– Once the image is positioned in the frame as a clipping mask, use the rectangular marquee tool to make a selection of the image just a bit larger that the frame opening.
– Do the command “Layer via Copy” to “crop” the image to new layer that now becomes the image for the frame. (Right click in Photoshop).
– Click the FX symbol at the bottom of the layers palette for adding a layer style; choose “Inner Glow” option, set the Blend mode to Multiply and adjust the Opacity level as desired.
Seems to work well for me …
Thanks for the input, Bill. Always several ways to do something in Photoshop. 🙂
I always got some exclusive ideas when I’m visiting your blog. Now this time placing an image in a digital frame and adding an inner shadow with photoshop, Really awesome.