

Making Photoshop brushes from your overlays is very easy. I offer a lot of the French Kiss assets as overlays instead of brushes. Overlays are more universally useable than Photoshop brushes, are practically unrestricted for size, and are often more convenient to use.
If you prefer, however to use brushes, you can easily create your own set.
I use Photoshop to create my brush sets, but I decided to do this demo with Photoshop Elements to make sure I was passing on the right information to Elements users. It’s pretty much the same in both applications.
[hr]
The Quick Guide
Detailed instructions always look more intimidating than the process really is. To give you an idea of how easy this is, here’s a quick guide which is explained in greater detail afterwards.
- Open up each overlay. (One at a time.)
- Resize if needed: (Be sure you have a back-up!)
Elements: 2500 pixels max.
Photoshop CS5 and below: 2500 pixels max
Photoshop CS6 and above: 5000 pixels max - Create the Brush: Menu/Edit/Define Brush (Elements) Define Brush Preset (Photoshop)
- Save the Brush Set: Open the Preset manager, select the brushes, save the set.
[hr]
A More Detailed Guide
A Few Brush Facts
Before we begin, here are a few quick facts about brushes that you need to know.
- You can create brushes from any image file, be it color, grayscale, flattened or with transparency. You’ll have best results making brushes from color images if you convert them to grayscale first as it’s usually best to increase the contrast of the grayscale images. In the case of B&W overlays which have transparency, you don’t have to do anything to them. Just open them up.
- Brushes have size limits.
Elements: 2500 pixels max.
Photoshop CS5 and below: 2500 pixels max
Photoshop CS6 and above: 5000 pixels max
If your overlay is larger than those limits, save a copy of the original overlay before you resize it.
Opening And Resizing The Overlays
- Open up the overlay you want to create a brush from.
- If you are using Elements, make sure you are in the Expert tab.
- Check the pixel dimensions of the file. Make sure you are not over the brush size limit of your Photoshop version or Elements. (see above in Brush Facts #2.)
- If needed, resize the overlay. Be sure to SAVE AS first! You don’t want to accidentally resize the only copy you have of your overlay. (You do have back-ups somewhere though, right?) If you are brave, you can resize the overlay, make the brush and then don’t save the changes when you close the overlay.
Creating The Brushes
To create a brush, all you have to do is select Edit from the menu and then Define Brush Preset (Photoshop) or Define Brush (Elements.)
Note: If this option is grayed out, it means your image is too large for the brush size limit. See Opening and Resizing The Overlays above.
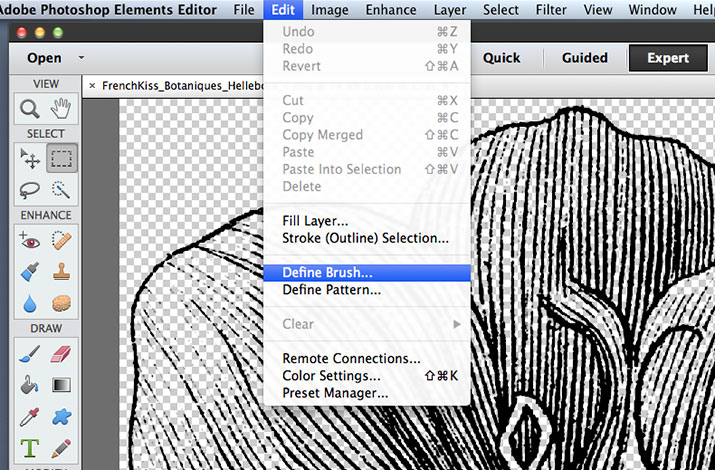
In Elements, choose “Define Brush.” In Photoshop it will say “Define Brush Preset.”
Name The Brush
When the dialog box to name your brush comes up, you may wish to delete the extension in the name. It doesn’t matter if you leave it.
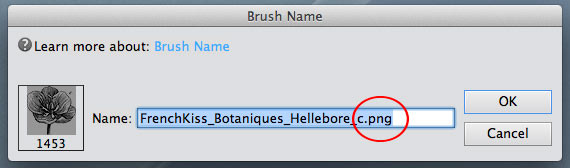
Delete the extension in the name if you wish.
Repeat this process for all the overlays you wish to create brushes from. Eg. all the overlays in a collection.
Save The Brush Set
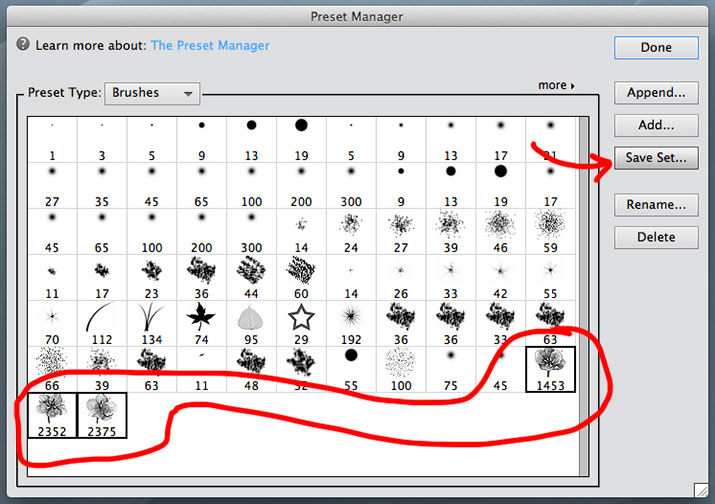
- Open up the Preset Manager. Menu/Edit/Presets/Preset Manager.
- Select all the brushes you want to include in your set. Hold down shift to select contiguous brushes, hold down Command (Mac) or Control (PC) to select non-contiguous brushes.
- Click the Save Set button.
- Save your brushes to a location where you store your Photoshop brushes. I recommend that you do NOT save them in the Photoshop Brush Presets folder. I store my 3rd party brushes in a Brushes folder in a parent folder named Photoshop Tools in my Pictures folder. I also store my actions, scripts, etc. in the Photoshop Tools folder. Make sure this folder is backed up somewhere regularly. Alternately, you may wish to save them with the overlays so that you can remember that you made a brush set from them. When I have brushes and overlays, I usually put the brushes with the overlays. If you use a brush management app, it will be easy to find all the brushes on your computer.
- Name the Brush Set. I recommend naming the brush set the same name as the overlay collection.
Select your brushes and then Save the Set.
Pretty easy, right? Please let me know in the comments if you need anything clarified.

American Photographer and Designer living in France with my French husband, 2 Weimaraners and Cat Rescues. Camera, Mac, studio, garden.

Thank you so much so cool!
Thank you so much! Your tutorials are so helpful and so cool!
Thank you! Glad to hear they are helpful.
Thank you for all great tutorials ,freebies, I learn so much from you. love FK collection.
Thank you, Mai!