

If you prefer using overlays to Photoshop brushes or have software or a version of Photoshop not supported by most brushes, here are two methods to create overlays from Photoshop abr files.
Method 1: Brush Management Apps
By far, the easiest way to create overlays from Photoshop brushes is to use an app that will extract PNG files from the .abr file. (.abr files are the type of file used for Photoshop brushes.)
abrMate
For PC users, there is the free app called abrMate. This app can preview, organize and export brushes. I haven’t used this app as I work on a Mac, so let me know if you have any feedback on it.
Brush Pilot
Brush Pilot is an app exclusively for Max OS X which is similar to abrMate and can be used for previewing, organizing and exporting PNG overlays. It is modestly priced at $25. Brush Pilot will automatically search your computer and find all instances of .abr files. I have Brush Pilot and when I export the PNG files, it creates a folder named the same as the brush, which is nice. Each overlay is only numbered though. If you are a Photoshop user and like to have tidy, well-named files, use Bridge to do a Batch Rename. Menu/Tools Batch Rename.
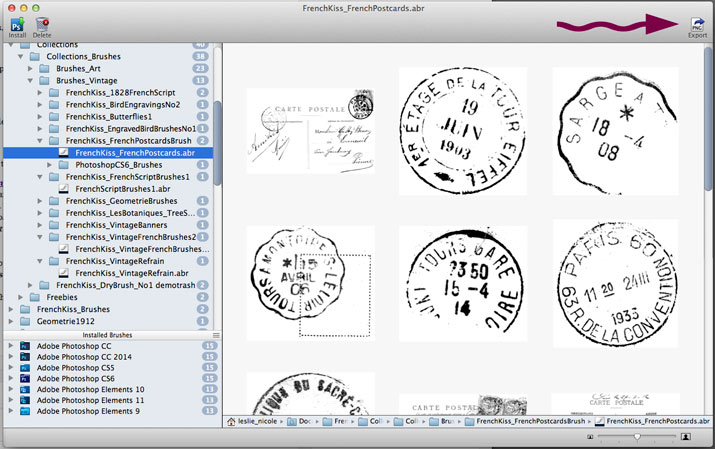
Using Brush Pilot to Export PNG files from brushes. Arrow indicates export button. Easy Peasy.
You may also want to check out the tut: Managing Your Photoshop Brushes.
Method 2: Manually Creating Overlays In Photoshop or Elements
If you are able to open and use Photoshop brushes, but just prefer using overlays, they are really easy to make. With that said though, the two apps above make it so easy that I highly recommend them as a first option. If you only want to do a few overlays though and don’t mind a little extra work, here are the steps to follow to create overlays from Photoshop brushes manually. Note: I want to reiterate that this method only works if you are able to load the brushes in your version of Photoshop or Photoshop Elements. If you can not load the brushes, your only option is to use one of the apps above.
- Load the brushes. See my tut Installing and Using Photoshop and Photoshop Elements Brushes if you need help.
- Create a new document. Command + N (Mac) or Control +N (PC) For Photoshop versions prior to CS6 and Photoshop Elements, the maximum size for a brush is 2500 pixels. For Photoshop CS6 and above, the maximum size is 5000 pixels. Make the new document larger than the largest brush so you have ample room to stamp without cropping the brush. To make it easy, make the new document either 2800 x 2800 pixels or 5500 x 5500 pixels depending on the brush set you want to make overlays from. The document should be 8 bit, grayscale, 300 ppl, with a transparent background. If you think you will be doing this a lot, then save your Preset. See graphic below.
- Make sure your color picker foreground is set to black. Keyboard shortcut is D.
- Verify that the brush opacity is 100%.
- Select the first brush and stamp once onto your document, taking care that none of the brush is cropped off along the edge.
- Now from the menu, chose Image / Trim. From the dialog box, choose Transparent Pixels and check all the boxes. This will crop your document to exactly the size it should be to accommodate the brush image. See graphic below. If you don’t have the Trim feature, just crop the document to remove excess transparent areas.
- Save as either a Photoshop file or a PNG file. PNG files are smaller file sizes. I usually chose smaller file size since I am generally uploading the files for download. Interlace should be set to None. Tip: Save them all to the same folder and name the folder and the overlays the same as the brushes so that you remember where the heck they came from! See graphic below.
- Repeat until you have done all the brushes desired.
Creating a New Document for a transparent overlay.
Make the document larger than your brushes so you have room to stamp the brush, 300 Pixels /inch, Grayscale, 8 bit, Transparent background.

Create a new document. Grayscale, 300 ppl, 8 bit, Transparent background.
Cropping an Overlay using the Trim feature in Photoshop.
An easy way to crop an image with transparency. From the menu, choose Image / Trim. Regular cropping can also be used.
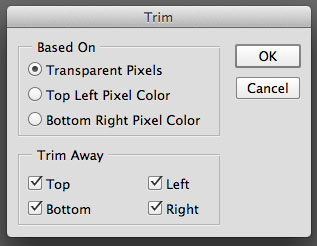
Crop the overlay using the Trim feature from the Image menu.
Save As PNG.
You could save your overlay as a Photoshop file or save as a PNG file for smaller file storage.
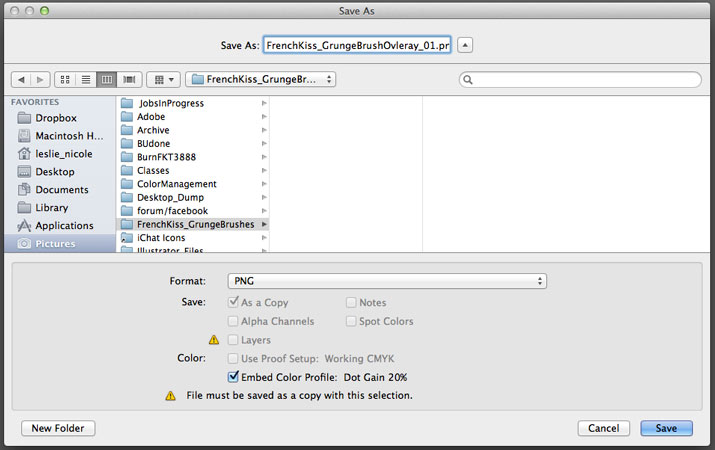
Save As PNG. Don’t be alarmed by the warning icons. They just mean that the file will be saved as a copy.
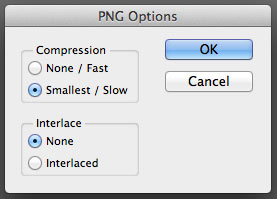
You have a choice of the compression for the PNG.
Final Words
There you have it. Easy Peasy.
Read further about the benefits of overlays vs. brushes in the article: Brushes or Overlays?

American Photographer and Designer living in France with my French husband, 2 Weimaraners and Cat Rescues. Camera, Mac, studio, garden.

My PC is a Windows OS. I haven’t tried abrMate, but I do use, and think Tumasoft’s Argus preset viewer is absolutely indispensible. With it installed I can view all presets, fonts, and PSD files, inside Photoshop/Photoshop Elements, as well as outside in their folders. Argus, too, will not work with Mac.
Thanks for the tip! I’ll have to check into that.