

When I uploaded some of the free textures to the member download area I didn’t notice that my Lightroom uploader plug-in had lost it’s preset and uploaded the free textures at 72 PPI. They weren’t down-sampled and were still high quality 3888 x 2592 pixel files. I received several emails saying “I thought your textures were high resolution?” While I’m glad that the error was pointed out and I’ve since replaced them, it made me realize that I should help people understand the relationship of pixel dimensions and resolution settings.
Clarifying DPI vs. PPI
First, A quick note to clarify terminology. Most of us say DPI (dots per inch) when we really mean PPI (pixels per inch) This terminology is widely misused, and it’s become so mis-used that even those of us who know the difference mis-use it to avoid confusion! Dots per inch refer to how many dots a printer or image setter, etc. can lay down or the resolution of a monitor. It has little to do with your image resolution. For the rest of the article, I’ll refer to image resolution properly as PPI.
Answer the the 2 questions below to test your understanding of file resolution and image quality.
1. Which Of These Files Is Capable Of Producing a High Quality Print?
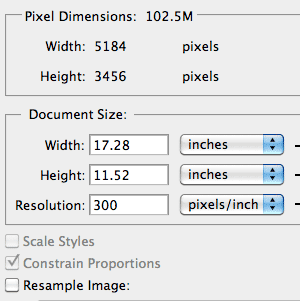
The two dialogue boxes below show an Image Size with the Pixel Dimensions of 5184 x 3456 pixels. In the first, the resolution is set at 72 PPI and in the second, it’s set at 300 PPI. Which of these files would be capable of printing an 11×14 inch print?

2. Which Of The Files Below Is High Resolution?

Answers
1. These files are exactly the same size and either are capable of printing an 11×17 of exactly the same quality.
2. While technically, the first file’s resolution is set to 300 ppi, it will only print an image at 3.33 x 5 inches. The second file, even though it is set to 72 PPI is capable of printing an image of 8.64 x 12.96 inches. Which would you consider to be high resolution?
Resolution Setting Vs. Resolution Capability And Image Quality.
We’ve gotten hung up on equating image’s resolution setting with image quality. I’m sure you’ve read somewhere that for print, your images should be 300 DPI (PPI). This is a good rule of thumb, but it’s often misunderstood. We have focused on 300 ppi, but it’s only a document setting and not necessarily indicative of the overall file size or file quality.
It’s All About The Pixel Dimensions
The pixel dimension of your image determines what size and PPI your image can be.
Pixel Dimensions are the true measure of “High Resolution.”
You can see in the examples above, that with the Resample Image unchecked, the pixel dimensions are fixed and only the document size settings are variable. You can think of Pixel Dimensions as being the size you have available and the Document size showing the output settings. Until you check “Resample Image” any changes you make in the document size area do not change your actual file size.
A Quick Illustration
To illustrate that the Pixel Dimensions are more important than the resolution, I’ve made a quick video where I changed the PPI of a texture to 72 (with Resample Image unchecked). I then drag the texture into my file set at 300 PPI that has the same pixel dimensions as my texture. Did the 72 PPI texture come in smaller than 300 PPI image? No! It’s exactly the same size. Photoshop recognizes it as being the same size because the pixel dimensions are the same even though the PPI is different.
Understanding the 300 “DPI” (PPI) Rule Of Thumb
Let’s look at where the 300 “DPI” (PPI) rule of thumb comes from. For offset printing — that’s printing with a half tone for media such as newspapers, magazines and books—we’ve been told to supply the printer with images at 300 PPI.
The real rule of thumb in offset printing is that an image’s PPI should be 1 1/2 – 2 times the lines per inch (LPI) of the printing method. Most magazines are printed at 133 LPI. Two times 133 is 266 PPI. So, the actual maximum PPI needed is 266 for typical printing. The rule of thumb became 300 PPI because that gave you leeway if you needed to enlarge the image slightly for cropping. When I started in digital imaging, digital cameras were almost non-existant. Negatives and chromes were scanned and a decent drum scan was expensive. It only made sense to scan a little larger than you needed. Plus, that leeway in size could be important if the art director needed to crop in or make a change in the layout.
Today when most of us have digital cameras that take an image at a certain fixed pixel dimension, 300 ppi is a setting, but is not the most important indicator of a file’s quality or its resolution possibilities.
PPI And Digital Printing Today
In my own workflow, my images are 240 PPI. This is the default setting that RAW images come into Lightroom. I’ve taken an online tutorial with Scott Kelby and an Epson printer representative. They recommended 240 PPI for printing with high-end Epson printers. This would be the same kind of printers that ImageKind prints with. The Epson representative said you start getting into the danger zone at 185 ppi. If you are unsure of what PPI you need for your own printing, check with your printer / lab.
A Simple Summary
Does this all mean that we stop bothering to change the image resolution to 240 – 300 PPI? No, it’s still a good practice to set your file to its intended output resolution, but just keep it in perspective that it’s a setting and not the only indication of an image’s size or capabilities.
I know it can be confusing sorting out the definitions of DPI, PPI, and LPI. You just want to know if your file size is adequate for printing! Here’s the simple recipe: If you receive an image that is set at 72 PPI and you aren’t sure if it has enough resolution for printing, just reset the resolution to 240–300 PPI (with Resample Image unchecked!) to see how large you can print that image. When you change an image’s PPI without resampling it, there is absolutely no change in the quality of the image.
Why trust my word? I worked in print design, production and digital imaging for 20 years. I’ve produced work to be printed for companies such as Pepsico, Ernst & Young, and Thomson’s Electronics. I’ve worked in the design and production departments for Macy’s West and Williams & Sonoma and I’ve worked as an assistant Art Director for a national financial magazine—to name just a few. I’m not a print guru like David Blatner, but I do have practical experience under my belt.

American Photographer and Designer living in France with my French husband, 2 Weimaraners and Cat Rescues. Camera, Mac, studio, garden.

Leslie,
Thank you for this! I will share it with all my photo editing friends! And from this I will now always uncheck resample. That’s been a problem for me too!
BTW, I’ve been visiting out-of-town for several days, returning just today. Am glad to check out all I’ve missed!
Great Betty, Thanks for inspiring me. Let me know if anything is unclear. 🙂
Leslie,
this was very informative. Thank you for taking the time and sharing your knowledge.
Charlotte wilson
Brilliant!! Thanks so much for putting this together and helping to clear up some of my confusion over the whole printing process. I’ve had to do some print work for auction fundraisers and book covers but the whole printing process really remains something of a mystery to me.
Jessica recently posted..Lensbaby Newbie 5 Quick Tips to Getting Started
Thanks for your comment, Jessica. Let me know if I can answer any questions. I’m not really a print guru. 😉 but I’ve been involved in printing for many years.
I am soooo thankful to run across this article. I’m about to start selling textures and wanted clarification on this.
Thanks!
Thank you so much for this information, it was really helpful for me.
BR
Erna Rós
I’ve submitted work to galleries that require 300 ppi. It’s eye opening to see that the recommended ideal start at 240. That’s very helpful info, because I really try and avoid using resample setting.
One question – are you saying that 240 ppi will produce a better print than 300 ppi?
Hi Max. 300 DPI (really ppi as you know) has become the standard for image submission and it’s a good, safe resolution target for printing. A ppi of 240 isn’t “better” it’s just perfectly sufficient for most printing purposes. I’d still submit images in 300 ppi when requested to keep things running smoothly. 😉 You don’t have to re-sample your image to do so. Just change the ppi without the Resample image checked. The main point of the article is to convey the idea that there is more to understanding ppi than only looking at that number. It’s more important to look at the overall pixel count. 🙂