

Note: this was originally published in my old Photo Artist Textures blog.
Adjustment layers are an essential part of post-processing. They allow you to make changes such as tonal adjustments to your image non-destructively. I remember the days before Photoshop 4 when we had to save endless variations of files and lived in fear of over-writing the master file. With adjustment layers, you can make a change and if you decide later it’s not what you want, you can change it without any damage to the file. (The more you make changes to a file such as tonal adjustments, the quality degrades.)
This tulip image needs some post-processing love. It has a slightly yellow cast and needs contrast.

Original Image needs some post-processing love.
To apply a Levels adjustment layer, select the New Adjustment Layer icon at the bottom of the Layers Panel. A drop down menu appears. As you can see, there are a number of choices.

Select the New Adjustment Layer icon.
After selecting Levels from the menu, a Levels Adjustment Layer appears in the layer panel.

At the same time, the Adjustments Panel opens up and I can make my tonal adjustments.

I brought up the highlights and took out some yellow.

Levels adjustment of contrast and yellow cast correction.
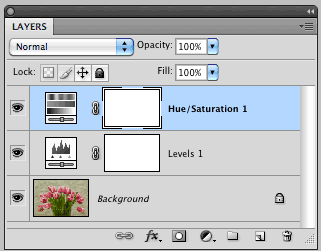
We can apply several adjustment layers if needed. Next, I’ll add a Hue / Saturation Adjustment Layer. I didn’t show the step, but as above, select the new adjustment layer icon and select Hue / Saturation from the menu.

The Adjustments Layer Panel opens to Hue / Saturation.

I selected Reds and used the Hue slider to make the tulips more purple. I then used the Saturation slider to increase saturation.

Reds are adjusted and saturation increased with Hue/Saturation.
Did you notice that the adjustment layers have layer masks? Just to demonstrate what can be done, I further adjusted the Hue/Saturation so that the tulips turn more purple and I then painted over certain tulips to retain the red that was in the original. In this case, it’s a rather garish result but this is often a handy feature.

Remember the Layer Masks!

Garish, but you get the idea of how to selectively apply adjustments with a layer mask.
In another tutorial, we’ll learn to use clipping masks to apply adjustment layers to selective layers.

American Photographer and Designer living in France with my French husband, 2 Weimaraners and Cat Rescues. Camera, Mac, studio, garden.
