

Adobe Photoshop and Corel Painter
Today, I’m going to give an overview of how I created my Weimaraner Puppy “Sketch.” For this tutorial, I will assume that you already have a working knowledge of Photoshop and how to use layers and layer masks and how to clone.
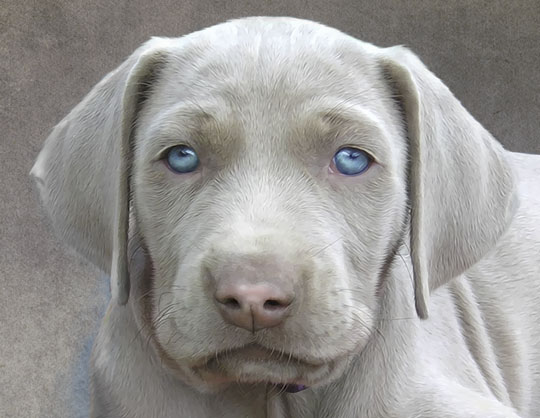
The Final Image

Evolution of the Image
Nearly 5 years ago when I bred a litter of Weimaraners, my only digital camera was a point and shoot Olympus C5060. It’s actually a pretty nice little point and shoot camera, but I mostly used it for snapshots. While I did occasionally venture into the RAW and TIFF formats, I usually just shot at it’s default 1Mb Jpeg. Were I to do it again, I’d have my Canon 40D, special lenses, and I know a lot more now about photographing dogs. That’s life, sometimes we capture images in less than ideal circumstances. Actually, although this image needed fixing, I have a fine arts degree and I enjoy melding my photography and drawing skills.
The Original Image
The original is a 1 Mb Jpeg Snapshot. Most of the puppies are in sleepy poses, but I thought the one puppy was posed quite nicely. This, by the way, is Buffy des Perles d’Artemis.

In my first round, I just cleaned up the background with cloning and pasting in Photoshop. I then applied a Topaz Labs Clean Filter* globally. I’ve found that the Clean Filter can add a well, cleaner, more illustrative look that can be especially useful for noisy jpegs. I also applied a levels adjustment for overall tones.

This was a nicer snapshot, but I still didn’t feel very satisfied with it. I decided to try placing it in a less distracting background.
The Background
I explored different textures and colors for the background. I tried various shades from green to blue. I finally decided that the background needed to be subtle and neutral. I chose my Classique Keepsake Texture and had to play around a bit with adjustment layers to get the exact tone I wanted.

After Layer Adjustments of Levels, Color Balance and Hue/Saturation, the texture became a neutral tone that complemented the pup.

Both textures are available in the Classique Texture Collection series.
The Puppy
The puppy is laying on a red blanket surrounded by grass. A little of the paw has grass blades covering it. I had to do a bit of cloning to re-create the dog nails and clean up the blanket. I didn’t get too picky in the blanket as I knew only a suggestion would be visible.

After cloning the blanket and grass away, I determined that I wanted the blanket to be blue. I then used a Hue / Saturation layer adjustment to tone a copy of the puppy layer. I placed the original puppy photo in color above and used a layer mask so that the blue background from below shows. I also added a little bit more of a pink tint to the nose using a layer set to overlay and then painting with pink color.

Here’s the Layer Panel. (In hindsight, I could have used a layer mask on the hue/saturation layer and not needed to duplicate the puppy layer.)

I then further edited the layer mask until just a little bit of the blue from the blanket still came through. You can see the transparency of the layer below.

Here is the Puppy placed on the background texture

Cleaning Up
Buffy is now placed on the background, but we need to do some clean-up and editing. I’ve divided my layers into groups. First Buffy (the puppy) and then the Background. Let’s break it down.
Buffy the puppy
- I painted along the shadows around the puppy body with a little bit of brown color on an overlay layer to deepen the blue.
- I added a little bit more blue – again on an overlay layer.
- I painted with black and white on an overlay layer to burn and dodge areas that needed more definition such as where her ear separates from her back.
- I needed to desaturated where the red blanket had put a color cast on her coat. I used a layer set to a blend mode of saturation and painted with white. Because of the pup’s coloring, desaturating worked well. On another dog, a selective color adjustment layer may work better.
The Background
- The levels, hue / saturation and color balance layers are all to control the overall color of the texture.
- I used 4 layers set to overlay to burn in different areas to create more depth behind the puppy. I used four layers so I could try the intensity and placement in increments and still back out to a lesser level if I needed to.

Here’s my almost final image

Final Touches in Corel Painter
I could have done most of the following steps in Photoshop, but I like Corel Painter for this, so I then took the image into Painter for some final touches.
Blending
The Topaz Labs Clean filter works really well on short-haired dog coats, but it tends to go a little wild and twirly in some places, so I’ve gone in with a blender brush (usually grainy water) and smoothed and cleaned up the nose, the paw pads, the eyes and a few places on the coat. I also painted in some highlights on the coat and nose and blended them in.
The Blue Blanket
I used an oil pastel brush to put in just a little more blue in the blanket and to blend the blanket area better. I also added some highlights with an oil pastel brush.
Fuzzy Wuzzies
This is what I LOVE using Corel Painter for. I go in with my Wacom Tablet
and soften and paint in the hair around the edges. I have some awesome hair brushes that I got from Fay Sirkis.

Detail Before Painter

Detail After Painter
Well, I do hope that helps you to see the process I went through. Please let me know if that was clear or if you have a better way to do anything!
Note: The Topaz Labs Filter link is an affiliate link – I get a small commission from any sales. I really do use these filters on just about every image. There are also some Amazon.com links that are also affiliate links.
Resource:

American Photographer and Designer living in France with my French husband, 2 Weimaraners and Cat Rescues. Camera, Mac, studio, garden.

outstanding. very skillfully done. i especially like the blue touches echoing the eye color. bravo leslie! (and what a fine model).
Thanks so much, Chris. I feel like you’ve released my inner artist. 😉 I look to you for the level of the bar I hope I’ll someday attain.
this Graphics Awesome really.