


Learn to use a hand-drawn digital frame for your design using Photoshop or Elements.

Using a hand-drawn frame can add a bit of whimsy to your design. This is a sale announcement I used for a newsletter. The frame both encloses the design and adds to the hand-drawn effect of the fonts and other elements. In the file, the frame is black with a transparent background.
How To Use The Frame
To use the frame, it’s useful to know two different things:
- How to constrain your design within the frame.
- How to change the color of the frame.
1. How To Constrain The Design To The Frame
There are different approaches to using the frame in a design. You can either create the design separately, flatten it and place it with the frame or create the design within the frame. If you create the design within the frame, you will need to be able to group the layers so you can add a layer mask to all of the layers. This is the way that I actually did it, but for the sake of simplicity, here I’ve used a flattened version of the design.
Place The Frame And Design Together
- Duplicate your design. From the Menu choose Image / Duplicate
- Add extra Canvas to the file. From the Menu chose Image / Canvas Size. Add around 1 inch all around.
Note: I chose this method because it can be nice to have the extra design elements that are outside the live area. This can cause problems though if you have adjustments such as overlay burn/dodge areas or masked areas. Watch out for undesired elements showing up. If they do, you might be better off flattening the file before you add canvas area or fixing the areas that need attention. - Flatten the design. Menu / Layer / Flatten Image.
- Duplicate the design layer. Choose the background layer and hit (Mac) Command + J or (PC) Control + J
- Select the background layer and fill it with the background color you wish. In this case, that was white.
- Place the frame above your design layer and size it the way you wish.

The frame placed over the design.
At this point, the design spills over the frame and the frame is still black. Now, we’ll constrain the design to within the frame. This is done by placing a Layer Mask on the design layer.
Constrain The Design With A Layer Mask
- Make sure you have black as the active color in the color picker. Click D on the keyboard to bring colors to the default.
- Place a Layer Mask on the design layer. Select the design layer and then click the New Layer Mask Icon at the bottom of the layer panel. It’s the gray rectangle icon with the white circle inside. (Alternatively, from the menu chose Layer / Layer Mask / Reveal All)
- Now choose the frame layer. Select the Magic Wand from the tools and click in the outside of the frame. This will create an active selection.
- Select the design layer again and click the layer mask area in the layer.
- Fill the selection with black. (Mac) Option + D or (PC) Alt + D.
The design should now appear only in the frame.
2. Change The Color Of The Frame
If you want the frame to be black, you can stop here, but if you would like to change the color, read on.
Use a Clipping Mask with a Solid Color Adjustment Layer to change the color of the frame. That sounds complicated, doesn’t it? It’s actually really easy.
(FYI: The original frame file is grayscale, so you won’t be able to change the color on the actual frame file. It needs to be placed into a file with and RGB or CMYK color space – like your design.)
I’m giving you two different methods, because it’s nice to know both.
Method 1
- With the frame layer selected, add a Solid Color Adjustment Layer from the Layer Panel (choose the icon that is the half white / half black circle and then select Solid Color.
- When the color picker comes up, use the eye dropper to choose a color from your design or the color swatches.
- With the color fill layer selected, hit the keyboard combination: (Mac) Command + Option + G or (PC) Control + Alt + G. This will create a clipping mask that constrains the color to the non-transparent areas of the frame. On the color layer you will see a little arrow pointing down.
- To change the color later, just double-click the Solid Color layer and use the color picker to either choose a color in your design or from your swatches.
Alternate Method:
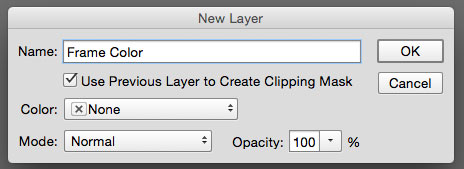
- With the frame layer selected, from the menu choose Layer / New Fill Layer / Solid Color.
- Name the layer if you wish. I chose Frame Color
- Check “Use Previous Layer to Create Clipping Mask.“
- For Color, leave it on None.
- When the color picker comes up, use the eye dropper to choose a color from your design or the color swatches.
- To change the color later, just double-click the Solid Color layer and use the color picker to either choose a color in your design or from your swatches.
Your final Layer Panel will look like this:

Let me know in the comments if you have any questions.
The Fonts used and textures used to fill the text can be found in this store blog post.
This frame is the subscriber freebie for July 2015. Sign up below if you would like access to the member freebies with monthly freebies.

American Photographer and Designer living in France with my French husband, 2 Weimaraners and Cat Rescues. Camera, Mac, studio, garden.
